For those of you starting your Senior Design Projects for an engineering degree, I wish to provide you some advice, tips and what not to do when starting and doing your project. You may be near the end of your journey, but the fun has only just begun.
You will need more time to test than you think!
In a perfect world, all members of the team will have no conflicts of time availability and will not have other responsibilities like other classes, family, or emergencies to take them away from the project. But in reality you may only have an hour or two every other night to get together and work on the project.
There may be lots of exchanging the project from hand to hand so each member can complete and test their responsibilities for the project. All of these transitions, planning, and acquiring supplies takes a great deal more time than you will realize.
If possible, give yourself an extra month buffer for testing your project. This will allow you to troubleshoot any issues, make necessary improvements, and most importantly document results for your report.
In short, plan for the worst but hope for the best.
Document EVERYTHING!

Document everything, either by taking pictures, taking video, or simply writing down voltages for various tests. All of this information is valuable and can be used to document your progress and be used in your report. Nothing is too mundane to document and most of the time you will be happy to have it at the end of your journy.
There were several times where I documented myself doing an initial test (like the screenshot from a video shown above) where I was able to provide evidence that we proved the system worked from the beginning when questioned about it during or presentation. Just have it available, it can only help you in the end.
Make diagrams, schematics, and graphs for your own reference

Any good engineer worth their weight knows that they need to create drawings, schematics, and graphs showing various results for both reference during project assembly and troubleshooting if there is an issue.
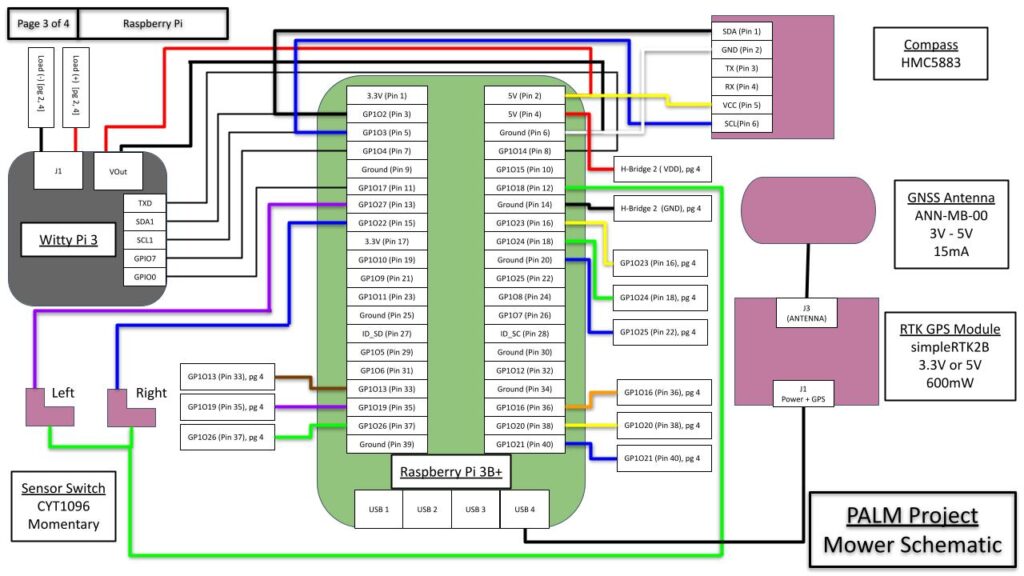
With our project having so many different moving parts, sensors, devices and wires, we needed some sort of wiring diagram to follow so that we don’t mix up wires and trust our minds to connect everything correctly. Doing this also helps anyone making code know what I/O pins to interact with for various operations.
This is one of those tips that will probably take a few hours to make but could save you weeks in troubleshooting and prevent damage from supplying the wrong voltages to various components.
Learn 3D CAD programs

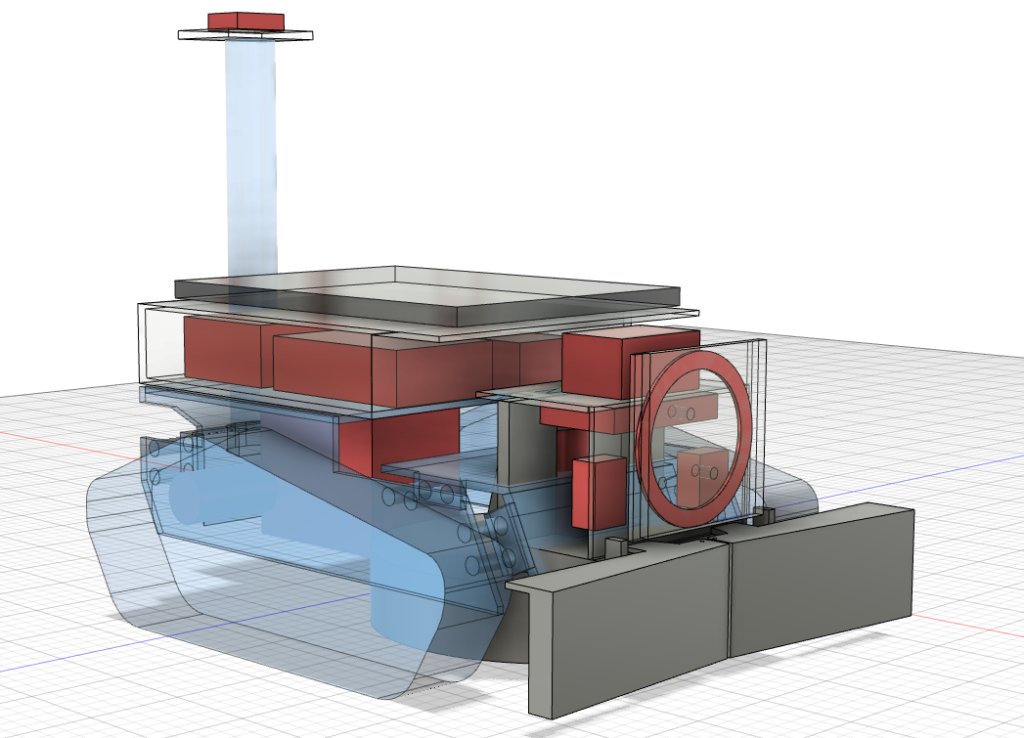
Lets face it, if you are making a physical product that requires a body or moving parts, you will need to be able to render it for production or reference. Todays 3D CAD programs are easy to learn, powerful, and quite a few of them are completely free.
You can easily Google “best free 3D CAD program” and get a massive list to choose from. The one used for this project was Fusion 360 as they have a free student version that you can sign up for. Another great program that many people use is SketchUp and some say that it is easier to learn.
ONLY DO INDOOR PROJECTS

This project was a solar powered automatic lawn mower that used a high precision GPS module for movement controls. While this sounds cool, we had to deal with a bunch of issues like weather and tree cover that made the project difficult. We had to deal with rain nearly every day for the last two months of our project, which made any outdoor project hard to test.
The weather is unpredictable, combining this with schedule limitations of group members is a great way to delay testing. Unless you have a 100% waterproof project that you aren’t afraid of leaving outside when a storm hits while you are at work, don’t plan to build it.
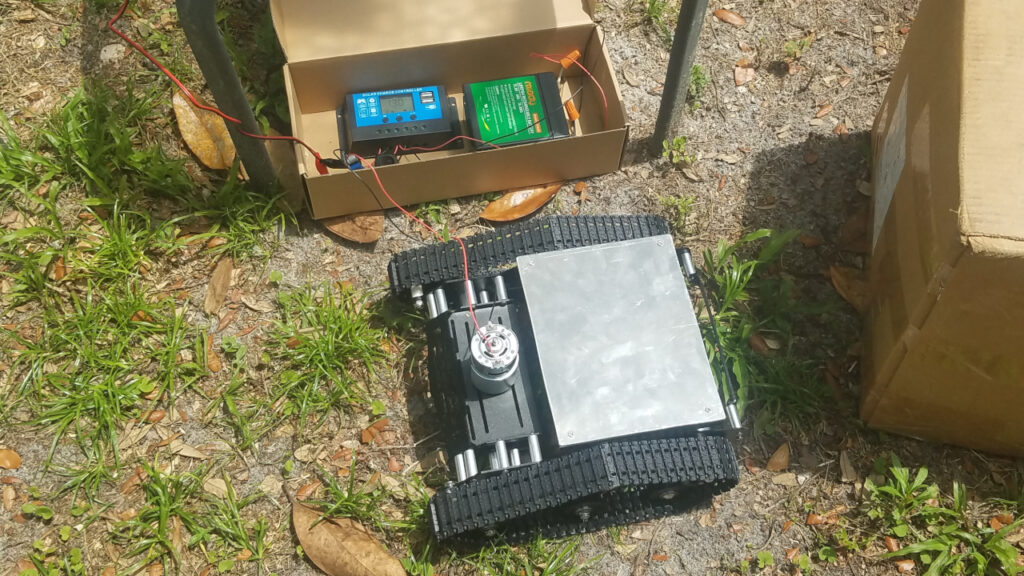
If you do an outdoor project, you may have to make accommodations and rigs to allow the system to survive outdoors. The picture above shows just this where I had my mower project (which wasn’t waterproof) inside and the solar panel on a long wire outside so I can close the door when it rains.
For those of you who think it wont rain on you, good luck.
Understand power supplies

This subject can make or break your entire project! Simply connecting a 5V supply from your Arduino or Raspberry Pi will not be able to operate several 5V motors at once!
Here are some things you need to look at when designing your power supply:
- How much voltage/current/Ah will your power source (ie battery) be able to supply without damage?
- How much power can your motor controllers continuously handle?
- How much power can your voltage regulators continuously handle?
- Your Arduino and Raspberry Pi can’t handle large loads and should never be used to drive motors.
- Driving power directly from a battery without some sort of controller may result in overdraw without a cutoff and damage the battery.
- If everything were to activate at the same time, will the system be able to handle it?
Have PCBs manufactured early!
I worked for a contract manufacture (CM) who builds PCBAs for 10 years and now work for a company that contracts these said CMs to build their assemblies. The time it takes to design the circuit, the PCB, order parts, have the PCB fabricated, and finally have all the parts populated can take months from start to finish.
It isn’t uncommon for the complete design and assembly process to take 90 days or more for industry professionals to compete from start to finish. While you may have a simple circuit to be built, you need to understand that your board may not be made as soon as you order it, you have to order all the parts, and then the shipping times may take days to weeks to get to you.
While working for this CM, I helped several semesters worth of EE students who were designing their own boards from design to component population, and even troubleshooting. All of them barely had their boards in hand and ready to test just weeks before they were to present. This allowed for almost no room for error and any major issues may cause them to have to withdraw.
If you are on a two semester track (first semester proposal and second semester design) try and have your PCB designed and ready to order early in the design semester. This means you should be designing the PCB during the Proposal semester to prevent any delays and allow for troubleshooting, especially if it is your first time
Think about the end user of the product
As an engineer, you may be hyper focused on the design requirements and not actually think about how it will be used, or even assembled. Always think about any component addition, modification, or design element with operational functionality and usability in mind.
Be mindful about user interfaces, ease of use, environmental interactions, and complexity of use.
If you have a failure, acknowledge it!

Lets face it, if you have a complicated project, there will be some failures that you didn’t see coming and won’t have time or money to fix. This is fine.
What you will need to do is acknowledge that there are faults of the current system and come up with resolutions to fix it. Never hide it or dismiss the failures, the design review board may give you negative points for trying to hide problems and could result in you failing your project.
Understand limitations and expense of technology

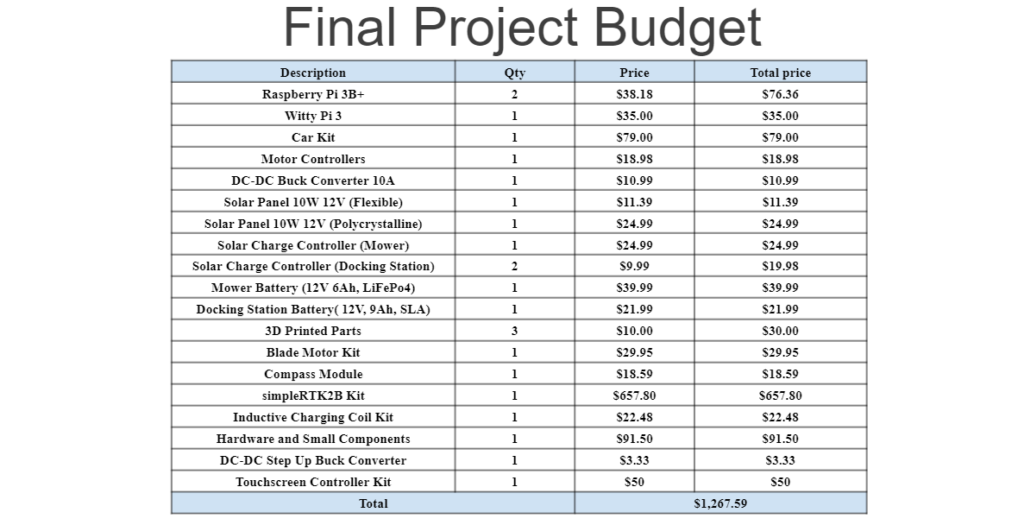
Many projects could be quite affordable, but projects like ours will cost you a lot more money that you expected. The reason for ours costing so much money was due to us not fully understanding the limitations of a standard GPS modules accuracy (10 meters) resulting in us purchasing a very expensive system that on it’s own exceeded the recommended budget of the project.
Your advisor may recommend that you add or subtract certain features to your project, before committing to this, do thorough research on the pros and cons of each suggestion. For us, the removal of an underground boundary wire and using terminology like a “docking station” resulted in the project needing a precision GPS module with RTK capability and to introduce a complex inductive charging system to the project.
Build to the capabilities of your team
Finally, your project team will have a mix of strengths and weaknesses that will shape the overall limits of what you can do as a team. Before picking a project, your team needs to sit down and discuss what each member has experience in and have a real interest in learning about. Don’t assume that you can do it all, this will cause delays as the team may have to learn or perform a task that nobody is familiar with.
Subjects the team should discuss and see who is capable of doing:
- Coding
- Soldering
- Mechanical Assembly
- Practical experience with multimeters and scopes
- Product procurement (finding and buying components, its not as easy as you think)
- PCB Fabrication
- Circuit Design
- Creating schematics, drawings, CAD, Graphs, and Reports
- Component/systems integration
- Power supplies to complex systems with multiple voltage requirements.
Final words
You are on your way to finishing your degree, but it doesn’t have to be a bad experience. I have seen teams repeatedly hit delays and problems that cost both time and money the team does not have. Know your limits, ask for help from advisors, companies, or even other classmates.
The most valuable asset you will have for this project is your time. There were weeks where I was putting in an additional full time job into the project and had only a few hours of sleep.
My final suggestion to help guarantee your success is to frontload as much of the work early on. From the beginning, don’t watch that TV series you have been wanting to see, spend less time on social media, and the only friends you will need until you graduate is your project team. If you can start testing everything early, you will result in a better product and have time for any other class exams you need to attend at the end of the semester.
Good luck and see you in the field.
